Last year I ordered an amazing Easter basket for my boyfriend. He's a huge Mario/Nintendo fan so of course the basket was a big Mario head. I bought it off of Etsy for more than I should have. So this year when I was thinking of what to do for his Easter basket I decided to stick with the same theme. Bowser seamed like the easiest to replicate without looking identical to Mario (like Luigi would). I'm sharing this because you can do this same technique with any character of your choosing and its free!
Well actually you'll have to purchase supplies but I promise it'll be cheaper than purchasing it off Etsy.
Well actually you'll have to purchase supplies but I promise it'll be cheaper than purchasing it off Etsy.

That was the Mario Basket I purchased. Pretty neat I thought. Alright so on to supplies!
Supplies:
Hot Glue Gun and Glue sticks
Scissors
Black Permanent Marker
Red Permanent Marker
1 big sheet of green foam
2 big sheets of goldenrod foam
1 sheet of orange foam
1 sheet of white foam
and a printer.
You want to make sure you get the thicker foam sheets, Michael's is where I got mine, Walmart had foam sheets however they were too thin and wouldn't work very well for a basket. So first you're going to want to print this picture of Bowser's face!

I expanded the picture so that it was the full size of a piece of paper, that way the basket would be big enough to hold a few things.
1. Once you have printed the picture you want to cut it out.
2. Lay it on one of the sheets of goldenrod foam and using the black marker outline it. Be careful I realized too late that permanent marker doesn't dry so quickly on foam it likes to rub off on your hands while your working so just watch out.
3. Cut out the goldenrod outline of the face and set it aside, this will be the backing to the face so everything stays together.
4. This is the fun part, actually it all seemed fun to me to see the results, anyways the picture you printed, cut the green part of bowser's face away from his cheeks and nose so that you have two separate pieces of Bowser's face, one that has the eyes and up and one that has his nose and down.
5. Taking the bottom portion of Bowser's face you want to lay it on the sheet of goldenrod foam and outline it again.
6. Cut out the outline of his mouth.
7. Taking the top portion of Bowser's face, you want to lay it on the sheet of green foam and outline it again, horns and all.
8. Cut out the outline of his face.
9. Now you want to cut the hair away from your original printed picture, eyebrows too!
10. Outline the hair and eyebrows onto the orange sheet of foam.
11. Cut out the outline.
12. Cut out the eyes horns, and teeth from your original printed picture and outline them onto the white sheet of foam.
13. Now for the piecing together. Hot glue the green foam portion of Bowser's face and the goldenrod foam portion of his mouth to the full goldenrod outline of his face so that they have a backing.
14. Stencil on Bowser's mouth, and nostrils using the black marker. Fill in his mouth with the red marker.
15. Hot glue the rest of the pieces (hair, eyebrows, eyes, teeth and horns) onto the appropriate places on his face, using the photo as a guide.
16. Using the black marker give Bowser his pupils.
This is what the end result of his face looks like:

Sorry about the foot being in the picture... Oh well.
So you can do one of two things, you can either make another foam outline of Bowser's face or you can make his shell for the back. If you want to just do an outline of his face skip to number__27__.
But if you want to make his shell then continue on.
17. Taking the same big sheet of goldenrod foam you want to make an oval about the same size as Bowser's head. I just layed his face down and outline an oval around it so they were about the same size.
18. Cut out the golden rod oval. This is going to be the backing for his shell.
19. Using the golden rod oval use it as an outline for a white oval the same size.
20. Cut out the white oval.
21. Now for the green, cut out an oval that is just a little bit smaller than the white one. Honestly I just made the green one the exact same size as the white one and slowly trimmed around the outside so that when you layed the green ontop of the the white oval there was about a 1/4 or 1/3 inch of white peaking out all around. (You don't need to make it perfect, it shows character.)
22. Lay the green ontop of the white oval and trace around it so that the white oval has a smaller oval inside. You want Bowser's shell to have the white outline but at the same level as the green part of his shell. So cut the inside away from the white so there is a nice thin white oval.
23. Hot glue the white oval and the green oval onto the goldenrod oval.
24. Now for the intricate part. You want to try to make as many hexagons within that green oval as you can using the black marker. Again it doesn't have to be perfect it adds character.
25. Cut out a variety of little white triangles from the piece of white foam.
26. Hot glue the triangles in the center of each hexagon so that it looks like Bowser's spikes.
This is what the back of my Bowser looked like:

Now for the easiest part of the basket!!
27. Take the 2nd sheet of goldenrod foam and measure out a rectangle with a width of as big as you want ( you want to make sure you can fit all the goodies your going to put in there so that's up to you) and a height of 16 inches.
28. Cut out the rectangle and hot glue it onto the back of Bowser's head. The height of the rectangle should be the side your actually hot gluing to the back of Bowser's head. You will have to hold this into place because the foam doesn't want to stay until the glue has hardened.
29. Hot glue the other side of the rectangle to the back of Bowser's shell. You will have to hold this into place as well until the glue dries. Tada!! There's your basket all it needs is a handle!
30. Cut out using the last of the goldenrod foam a thin rectangle, not too thin because it will be the handle. Hot glue it to either side of the basket and there's your Bowser, or other character of your choice, Easter Basket.
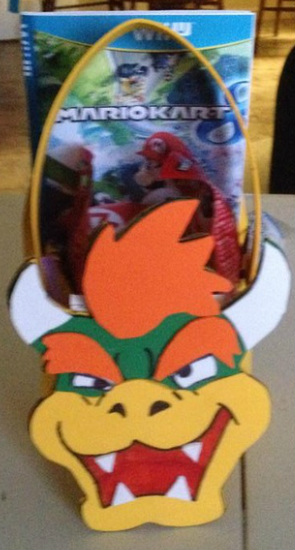
This is the finished project along with what I decided to put in his basket:
A picture of the game I pre-ordered for him: Mario Kart 8, sour patch bunnies, little Mario figures and a Mario mystery candy box.
27. Take the 2nd sheet of goldenrod foam and measure out a rectangle with a width of as big as you want ( you want to make sure you can fit all the goodies your going to put in there so that's up to you) and a height of 16 inches.
28. Cut out the rectangle and hot glue it onto the back of Bowser's head. The height of the rectangle should be the side your actually hot gluing to the back of Bowser's head. You will have to hold this into place because the foam doesn't want to stay until the glue has hardened.
29. Hot glue the other side of the rectangle to the back of Bowser's shell. You will have to hold this into place as well until the glue dries. Tada!! There's your basket all it needs is a handle!
30. Cut out using the last of the goldenrod foam a thin rectangle, not too thin because it will be the handle. Hot glue it to either side of the basket and there's your Bowser, or other character of your choice, Easter Basket.
This is the finished project along with what I decided to put in his basket:
A picture of the game I pre-ordered for him: Mario Kart 8, sour patch bunnies, little Mario figures and a Mario mystery candy box.

 RSS Feed